Quick Start
#Table of Contents:
- Intro
- Installing Serverless
- Creating a new service
- Deploying your first service
- Understanding the event model
- Adding a database resource
- Serverless Operations: Metrics and logs
- Cleaning up and next steps
#Intro
This quick start will take you through the basics of using the Serverless Framework.
We will:
- create and deploy a service with an HTTP endpoint
- cover how the serverless event model works and add some dynamic logic to our endpoint
- use the Framework to provision a database that will persist state between requests
- discuss some basic operations with Serverless
The quick start is aimed at teaching you the key components of Serverless. If you would prefer a walkthrough to build a project, check out these tutorials:
- Create a Node REST API with Express.js
- Make a Serverless GraphQL API
- Create a Python REST API with Flask
#Installing Serverless
First, you'll need to install the Serverless Framework. This requires you to have NodeJS & NPM installed.
You can install the Framework with NPM:
$ npm install -g serverlessAfter the install completes, you'll have an executable that you can invoke with the command serverless or the shorthand sls.
Check the version to make sure it's properly installed:
$ sls version
1.24.1
If you see a version listed, your install was successful!
To complete the actions in this tutorial, you'll need your environment configured with AWS credentials. If you haven't done that already, follow the steps in our provider onboarding guide.
#Creating a new service
With the Framework installed, it's time to create our service. The built-in create command can bootstrap a service from a template.
We'll use the hello-world template to get started:
$ sls create --template hello-world --path hello-world
Serverless: Generating boilerplate...
Serverless: Generating boilerplate in "/Users/alexdebrie/scratch/hello-world"
 _______                             __
|   _   .-----.----.--.--.-----.----|  .-----.-----.-----.
|   |___|  -__|   _|  |  |  -__|   _|  |  -__|__ --|__ --|
|____   |_____|__|  \___/|_____|__| |__|_____|_____|_____|
|   |   |             The Serverless Application Framework
|       |                           serverless.com, v1.24.1
 -------'

Serverless: Successfully generated boilerplate for template: "hello-world"
Let's change into our directory and look at the files:
$ cd hello-world
$ ls
handler.js	serverless.yml
The serverless.yml contains our Serverless configuration for the project. It gives you a way to describe your infrastructure as code and keep it directly with your project.
The contents of serverless.yml are (comments removed):
service: hello-world

provider:
  name: aws
  runtime: nodejs6.10

functions:
  helloWorld:
    handler: handler.helloWorld
    events:
      - http:
          path: hello-world
          method: get
          cors: true
Look to the functions block, as it's the core of a Serverless application. A function is an entrypoint to your code that will be triggered upon specified events.
There's one function listed—helloWorld. It has the a handler property describes the path to the handler file and the name of the function to be triggered within that file.
Further, it has an events property with an array of event subscriptions. In this example, we've configured an http event which is triggered on a GET request to /hello-world. You can configure a number of different events, including HTTP requests, messages in pub/sub topics, scheduled tasks, object storage notifications, or record batches in an event log.
Functions and Events. These are the building blocks of Serverless applications. You write the code to be executed and the events that will trigger that code.
Look at the handler.js file:
'use strict';

module.exports.helloWorld = (event, context, callback) => {
  const response = {
    statusCode: 200,
    headers: {
      'Access-Control-Allow-Origin': '*', // Required for CORS support to work
    },
    body: JSON.stringify({
      message: 'Go Serverless v1.0! Your function executed successfully!',
      input: event,
    }),
  };

  callback(null, response);
};
We have our defined helloWorld function. It implements the function signature from AWS Lambda which includes an event, context, and a callback function. Our function assembles a response with a statusCode, headers, and a response body.
We'll dig deeper into the function itself later on.
#Deploying your first service
We have a service. Our configuration is defined in serverless.yml. Our function is defined in handler.js. It's time to make it live.
Deploy your service with sls deploy:
$ sls deploy
Serverless: Packaging service...
Serverless: Excluding development dependencies...
Serverless: Creating Stack...
Serverless: Checking Stack create progress...
.....
Serverless: Stack create finished...
Serverless: Uploading CloudFormation file to S3...
Serverless: Uploading artifacts...
Serverless: Uploading service .zip file to S3 (404 B)...
Serverless: Validating template...
Serverless: Updating Stack...
Serverless: Checking Stack update progress...
..................................
Serverless: Stack update finished...
Service Information
service: hello-world
stage: dev
region: us-east-1
stack: hello-world-dev
api keys:
  None
endpoints:
  GET - https://li6gy63jl6.execute-api.us-east-1.amazonaws.com/dev/hello-world
functions:
  helloWorld: hello-world-dev-helloWorld
Your service is deployed! In the Service Information at the bottom, there's an HTTP endpoint to access your function. Copy and paste that into your browser.
I'm using Firefox, which has a nice viewer for JSON responses:

In 5 minutes and 40 lines of code, we have an active HTTP endpoint accessible from any browser that scales automatically and is billed on a per-request basis!
#Understanding the event model
Time to dig a little deeper into the event model of serverless compute. In the example above, we're using AWS Lambda. As I showed when looking at handler.js, we need to implement a function with a specific signature. This includes event and context arguments, as well as a callback function when using Node.
The event object is important to understand. It will have the dynamic content of your invocation—what was invoking it? What was the payload?
In our helloWorld function, we returned our full event in the response to make it easy to inspect. Notice that the event includes a lot of information like the HTTP method (GET), the various headers, and other parameters.
Let's make a new request but add a querystring to the request. In your browser, paste your endpoint and add ?name=Yoda:

The querystring shows up in our event under the querystringParameters key.
Let's add a second Lambda function that is dynamic based on the value of a querystring. In your handler.js file, add the following function below the helloWorld function:
module.exports.helloName = (event, context, callback) => {
  let name = 'stranger';
  if (event.queryStringParameters && event.queryStringParameters.name) {
    name = event.queryStringParameters.name;
  }
  const response = {
    statusCode: 200,
    headers: {
      'Access-Control-Allow-Origin': '*', // Required for CORS support to work
    },
    body: JSON.stringify({
      message: `Hello, ${name}!`
    })
  };

  callback(null, response);
}
This function will look for a name querystring parameter and return it in the response.
Let's add the new function to our serverless.yml too. Add the following code to your functions block:
  helloName:
    handler: handler.helloName
    events:
      - http:
          path: hello-name
          method: get
          cors: true
Then, run sls deploy to deploy your new endpoint.
Once it's live, hit your new /hello-name endpoint with a ?name=Leia parameter:
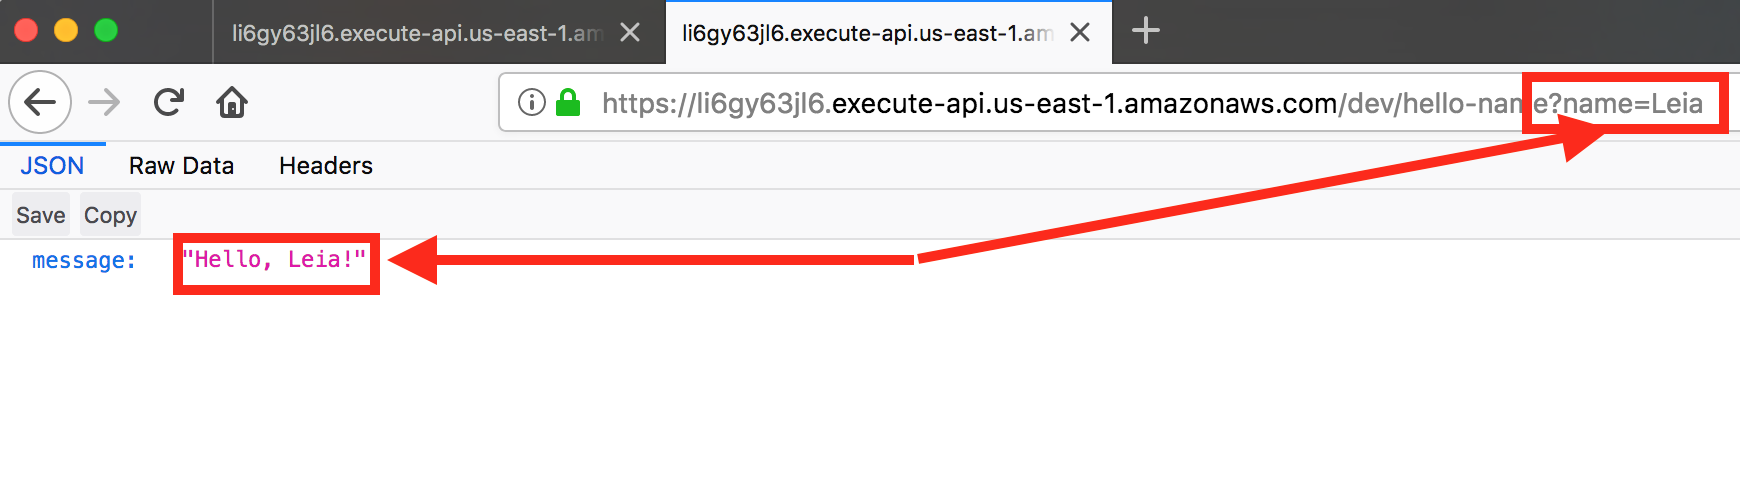
You can play around with different parameters to see it work. You can also play with different aspects of the event object.
In this section, we learned about the Lambda event model for HTTP events. We found out how to use the event object inside our function for dynamic behavior.
#Adding a database resource
Simple endpoints are fun, but interesting applications almost always require some sort of state. In this section, we'll learn how to provision a DynamoDB table with the Serverless Framework to be used in your Serverless application. Then, we'll implement two endpoints—one to store state and one to retrieve it.
First, let's provision a database. In your serverless.yml, you can provision infrastructure using the resources key. When using the AWS provider, you provision these resources using CloudFormation.
We'll provision a DynamoDB table as it's a Serverless-friendly database service due to it's managed scaling, low maintenance, and pricing model. It's a NoSQL database with a key-object model.
In your serverless.yml, paste the following configuration:
service: hello-world

provider:
  name: aws
  runtime: nodejs6.10
  iamRoleStatements:
    - Effect: Allow
      Action:
        - dynamodb:GetItem
        - dynamodb:PutItem
      Resource:
        - { "Fn::GetAtt": ["NamesDynamoDBTable", "Arn" ] }
  environment:
    NAMES_TABLE: { "Ref": "NamesDynamoDBTable" }

functions:
  saveName:
    handler: handler.saveName
    events:
      - http:
          path: name
          method: post
          cors: true
  getName:
    handler: handler.getName
    events:
      - http:
          path: name
          method: get
          cors: true

resources:
  Resources:
    NamesDynamoDBTable:
      Type: 'AWS::DynamoDB::Table'
      Properties:
        AttributeDefinitions:
          -
            AttributeName: name
            AttributeType: S
        KeySchema:
          -
            AttributeName: name
            KeyType: HASH
        ProvisionedThroughput:
          ReadCapacityUnits: 1
          WriteCapacityUnits: 1
There's a lot to digest here, so let's take it in pieces.
First, look to the resources section. We're creating a DynamoDB table using the required CloudFormation syntax. This includes giving it a required hash key (name) that will uniquely identify a particular key. We also specify how much read & write capacity units we want.
Notice that our resource is keyed as NamesDynamoDBTable. This is the Logical ID of our resource and will be used in other parts of our serverless.yml.
Second, let's look to the new things we've added in the provider block. We added IAM permissions that give our functions the ability to call the GetItem and PutItem on our DynamoDB table. IAM permissions are a complicated beast, but you can get a primer on IAM here.
In our provider section, we've also added an environment variable of NAMES_TABLE. It uses the CloudFormation Ref function to pull in the table name of our DynamoDB table using its Logical ID.
Finally, we have two new functions—saveName and getName. We'll use these to implement Create and Read operations for our simple API.
To implement these functions, paste the following into your handler.js:
// handler.js

const AWS = require('aws-sdk');

const NAMES_TABLE = process.env.NAMES_TABLE;
const dynamoDb = new AWS.DynamoDB.DocumentClient();


module.exports.saveName = (event, context, callback) => {
  let response = {
    statusCode: 200,
    headers: {
      'Access-Control-Allow-Origin': '*',
    }
  };
  const name = event.queryStringParameters.name;
  const age = event.queryStringParameters.age;
  console.log(`Request to save name ${name} with age ${age}`);

  const params = {
    TableName: NAMES_TABLE,
    Item: {
      name,
      age
    },
  }

  dynamoDb.put(params, (error) => {
    if (error) {
      console.log(error);
      response.statusCode = 400;
      response.body = JSON.stringify({ error: "Could not save name" })

      callback(null, response);
    }
    response.body = JSON.stringify({ name, age })
    callback(null, response);
  });
}

module.exports.getName = (event, context, callback) => {
  let response = {
    statusCode: 200,
    headers: {
      'Access-Control-Allow-Origin': '*',
    }
  };

  const name = event.queryStringParameters.name;
  console.log(`Request to retrieve name ${name}`);

  const params = {
    TableName: NAMES_TABLE,
    Key: {
      name
    },
  }

  dynamoDb.get(params, (error, result) => {
    if (error) {
      console.log(error);
      response.statusCode = 400;
      response.body = JSON.stringify({ error: "Could not retrieve name" })

      callback(null, response);
    }
    if (result.Item) {
      const {name, age } = result.Item;
      response.body = JSON.stringify({ name, age })

      callback(null, response);
    } else {
      response.statusCode = 400;
      response.body = JSON.stringify({ error: "Name does not exist" })

      callback(null, response);
    }
  });
}
We have our two functions, saveName and getName. saveName takes name and age as querystring parameters, then saves the result to a DynamoDB table. getName takes name as a querystring parameter, fetches the name from our DynamoDB table, and returns the name and age.
Deploy this service to AWS:
$ sls deploy
Serverless: Packaging service...
Serverless: Excluding development dependencies...
Serverless: Uploading CloudFormation file to S3...
Serverless: Uploading artifacts...
Serverless: Uploading service .zip file to S3 (700 B)...
Serverless: Validating template...
Serverless: Updating Stack...
Serverless: Checking Stack update progress...
....................
Serverless: Stack update finished...
Service Information
service: hello-world
stage: dev
region: us-east-1
stack: hello-world-dev
api keys:
  None
endpoints:
  POST - https://e4wtqlhq6j.execute-api.us-east-1.amazonaws.com/dev/name
  GET - https://e4wtqlhq6j.execute-api.us-east-1.amazonaws.com/dev/name
functions:
  saveName: hello-world-dev-saveName
  getName: hello-world-dev-getName
Then, test your function with curl:
$ curl -X POST "https://e4wtqlhq6j.execute-api.us-east-1.amazonaws.com/dev/name?name=Alex&age=29"
{"name":"Alex","age":"29"}
Note that you'll need to change the URL to match your URL as provided by the sls deploy command.
Then, you can retrieve your data with another curl command:
$ curl -X GET "https://e4wtqlhq6j.execute-api.us-east-1.amazonaws.com/dev/name?name=Alex"
{"name":"Alex","age":"29"}
Cool! It successfully returned my data.
In this module, we learned how to implement stateful applications with Serverless by using a DynamoDB table. We provisioned that table using CloudFormation in the resources block of our serverless.yml.
#Serverless Operations: Metrics and logs
When developing your application, you'll often want easy access to certain operational insights. This includes how many times your functions have been invoked and the logs emitted by your functions.
The Serverless Framework has built-in command to assist with these operational insights.
To check numbers around function invocations, errors, and more, use the sls metrics command:
$ sls metrics
Service wide metrics
December 7, 2017 7:31 PM - December 8, 2017 7:31 PM

Invocations: 9
Throttles: 0
Errors: 1
Duration (avg.): 112.11ms
By default, it shows metrics on a service level. To get metrics on a function level, use the -f flag:
$ sls metrics -f saveName
saveName
December 7, 2017 7:33 PM - December 8, 2017 7:33 PM

Invocations: 5
Throttles: 0
Errors: 0
Duration (avg.): 113.59ms
You can also check your application logs with the Serverless Framework using the sls logs command. You'll need to provide a function name with the -f flag:
$ sls logs -f saveName
START RequestId: aca02111-dc4c-11e7-a2c2-47f13c728428 Version: $LATEST
2017-12-08 19:19:13.825 (+00:00)	aca02111-dc4c-11e7-a2c2-47f13c728428	Request to save name Alex with age 31
END RequestId: aca02111-dc4c-11e7-a2c2-47f13c728428
REPORT RequestId: aca02111-dc4c-11e7-a2c2-47f13c728428	Duration: 111.07 ms	Billed Duration: 200 ms 	Memory Size: 1024 MB	Max Memory Used: 39 MB
It includes AWS machine logging around when the request started and ended, plus a full report of the execution. Finally, it includes any application logs you logged, such as this one:
2017-12-08 19:19:13.825 (+00:00) aca02111-dc4c-11e7-a2c2-47f13c728428 Request to save name Alex with age 31This matches the expected output from console.log() in our saveName function. The ability to log and view your logs can aid in your debugging process.
#Cleaning up and next steps
You made it all the way through the quick start! You should now know how the Serverless Framework works and understand the key concepts of functions and events. You know how to provision resources for your application and perform basic operations.
Before you move on, first remove your service so you don't incur any AWS charges:
$ sls remove
Serverless: Getting all objects in S3 bucket...
Serverless: Removing objects in S3 bucket...
Serverless: Removing Stack...
Serverless: Checking Stack removal progress...
................................
Serverless: Stack removal finished...
Now it's time to hop into some deeper tutorials and guides!
We recommend starting with one of these: